Monday, January 28, 2013

Review of the Focus in Paradise Nov-2012 Workshop in Kauai

Plantations Gardens

The Focus in Paradise Photography Workshop in November 2012 was held at the beautiful Plantation Gardens Restaurant at the Kiahuna Plantation Resort in Poipu, Kauai.  The restaurant was the original plantation house of the Koloa Sugar Plantation dating to 1930 and the location of Hawaii's oldest sugar plantation founded in 1835.
We had the use of the entire house for the workshop!


In this workshop we partitioned the training into two distinct days: Day-1 was all about the fundamentals of digital photography and Day-2 was focused on portraiture photography.  In the Fundamentals class, we explored all of the controls on the typical DSLR camera.  With those understood, we headed to the National Tropical Botanical Gardens up the road to use our new skills in shooting the beautiful flora growing there.


Flowers on Kauai are among the most beautiful in the world.  This Cannon Ball flower was captured with a hovering bee looking for nectar.  Note the excellent use of selective focus and minimizing the depth-of-field to throw the background out-of-focus.


The island of Kauai has a large variety of Heliconia.  In this image, the green leaves provide a nice background and the red flowers are perfectly framed by the unopened stocks.  A little post-processing we studied in class brings out the brilliance of the flowers that are sometimes shaded by the lush surrounding foliage.


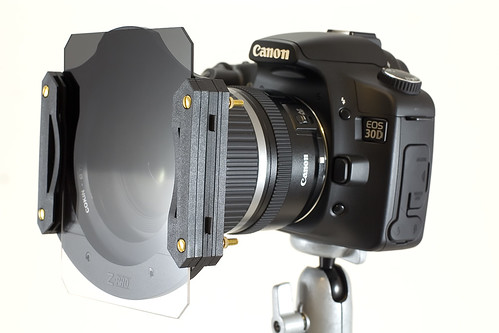
We finished Day-1 with a sunset shoot from the south shore of Poipu.  In the Fall, the sunrise and sunset can both be seen from the south side of the island.  A sunset shoot is the perfect opportunity to practice using ND Graduated Filters to help control the wide dynamic range of light that occurs as the sun is setting.  Additional work with post-processing tools learned in the workshop can produce stunning results.


In the Day-2 workshop we studied how to use natural and artificial lighting sources and the how the square-law affects the intensity of light as you move it away from the subject.  We built a portable portrait studio in the plantation house's sitting room and each student was able to shoot with a radio trigger on their camera controlling the lighting system.  We shot both people and objects with great results.  This doll, hand-made by one of the workshop students was a well behaved portrait model for us.


Overall the class enjoyed our first portrait photography workshop and we are looking forward to the next one at our February 23rd & 24th, 2013 workshop in Monterey, California.  We will return to this beautiful plantation house for our next Kauai photography workshop on May 9th & 10th, 2013.


Happy shooting,

Focus In Paradise

Wednesday, January 2, 2013

Shoot RAW + JPEG to Improve Your Editing


We are often asked why photographers should shoot RAW and JPEG files at the same time.  Remember that a RAW file is the unmodified image capture from the camera containing up to 4.4 billion colors while a JPEG file has been processed by the camera to reduce the file size and contains up to 16.7 million colors.   The JPEG file is anywhere from 75% to 95% smaller than the RAW file.  Many of today's new cameras from advanced point-and-shoot to DSLR cameras have the capability to create both files simultaneously and you will find for every photographer who shoots both formats, one who won't consider it. This holds true for professional, advanced amateurs and hobby photographers.

Shooting both formats can be very useful to a photographer who is just starting to shoot in the RAW format.  The image displayed on the camera's LCD is a JPEG image that has been processed by the camera from the RAW capture. The camera uses its own post-processing engine and the settings you have chosen in the camera for processing the JPEG image.  On Canon cameras these settings are called Picture Styles while on Nikon cameras they are called Picture Controls.  These settings modify how much brightness, contrast, saturation, and sharpness are applied to the original captured image in producing the JPEG file.  Select these Picture Styles/Controls carefully as the settings for a portrait produce significantly different results than settings for a vivid landscape.  When evaluating your image on the back of the camera, you are seeing the potential that can be achieved from future post-processing of the RAW file.  Of course post-processing of a RAW file can produce a result that is far better than any in-camera JPEG could be, so for highest picture quality begin your editing with a RAW image while referring to the JPEG as a guide.

During post-processing, having a properly exposed JPEG available to evaluate your RAW file processing results can be very helpful in learning and understanding what each adjustment in your editing software does to the RAW image.  In creating a quality picture, the RAW file provides the maximum pixel information available for post-processing which is why we generally don't edit JPEG files.  Additionally, since RAW files generally cannot be viewed without photography editing software, many professional photographers use the JPEG image to send to their clients for evaluation and selection prior to processing the RAW files. That way they only have to work on the images the client likes resulting in a large time savings.

Considering that these JPEG files may be sent to others, there are two additional in-camera settings you should also be sure to select prior to image capture: JPEG pixel size and JPEG compression level.  Most cameras provide a small, medium, and large option for pixel size and low, medium, and high levels for compression.  A small pixel size and high (1:16) compression will result in the smallest file size - convenient for sending by email. However, for the greatest image quality you would want to select a large pixel size and low (1:4) compression.

When shooting RAW + JPEG two file types are written to your camera's memory card.  The complaint often heard is having two files of the same image takes up too much disk space. While this is somewhat accurate (since JPEG files consume another 5% to 25% of the size of a RAW file), some options are available to you to manage the required storage.  In lieu of purchasing larger disk drives, any of the following can be implemented.
  • When loading images onto your computer you can keep both file types to assist in your processing skills.  You then delete the JPEG files after you finish your post-processing.
  • After loading the RAW + JPEG files on your computer, do not re-format your memory card.  Label the card to match your file system information and store it in a safe place. Then you can delete the JPEGs  from your computer. You will be able to review your raw processing against the images on the card by re-inserting them in the camera or connecting them to the computer via a USB port.  After  the keepers are marked, the rejects are deleted from your hard disk, and after you have post-processed the desired files, you can re-format the card for future use.
  • Keep both RAW and JPEG images on your computer and delete them when you are comfortable you are done with the JPEGs or you need more disk space.  Setting up a reminder to review your image files once a month will help in your hard disk management. Reviewing the remaining JPEGs after one month will allow you to re-evaluate images you have not processed and make the decision to keep the JPEG or delete it along with the RAW file.  A periodic review of your images is a good thing to do anyway!
An image from an in-camera generated JPEG will always look better on your computer monitor than an initial unedited RAW image, making the JPEG image a better indicator of what might be possible with skilled post-processing of the RAW image.  If you are not shooting RAW + JPEG and it is available on your camera, we suggest you give it a try.  Use one of the suggestions above if memory storage is an issue and get started.  See if it will assist in selecting your keeper images and in your processing accuracy to achieve the final image as your remember it at the time of capture.

Happy Shooting,

Alan and Roger

Saturday, October 13, 2012

Shooting Coastal Landscapes


Those of us that visit or live along the coasts are often out shooting in less than ideal conditions.  There is something about the ocean meeting the land that attracts photographers looking for the perfect sunrise or sunset. Living along the Northern and Southern California coast and a stone’s throw from Kauai’s beaches, we have refined our processes for shooting in a wet, corrosive and potentially dangerous environment. Tides are a mojor key to your coastal photography success,  High tides may obscure your foreground details or don't provide the correct water flow around or over rock features. At other times low tide will provide foreground objects that contribute to your shoot.  Scouting your locations will provide an increased opportunity for a successful image. We utilize a small notepad to detail locations for when we will return, noting if high or low tides are best and features we want to capture.

Of utmost importance is your safety.  All coastlines are subject to the rogue wave that is stronger than the preceding waves.  Take some time when first arriving to scout your locations or before shooting to watch the size of the waves and where they land in relation to where you want to stand.  Add a safety margin for the rogue wave and check the tide status.


1.  There are U.S. and International apps available for Android or iPhones that we use frequently.  When scouting a location, we verify the current tide status for use when pre-planning our sunrise and sunset shoots.  You may want to shoot when the tides (and often waves) are higher to capture the action they present.  You may also want to shoot when the tides are low, often exposing some good foreground subjects such as rocks.  Whenever you decide to shoot, never turn your back on the ocean for more than a few seconds as the unpredictable rogue waves can be dangerous!


2.    Watching the water for awhile often results in finding wonderful water movement between features you    
might miss.  When shooting a scene with rocks or features in the foreground, take your shot when the water recedes.  Using a slower shutter speed (1/20sec or slower) will give soft misty water paths as the water recedes. Where the water is coming over rocks or features you may want to shoot the incoming water (see Image-1 below). Again experiment with shutter speeds to get the effect you desire. 


Image 1:   Lava Rock Waterfall - Salt Pond Beach, West Side of Kauai
Canon 7D, EF-S 10-22mm @ 20mm,  1/20sec @ f16,    3 stop Graduated Neutral Density

3. Clouds are the second key to a great seascape.  While it is preferable to have clouds present there are those times when the sky is clear.  Photographers often add new backgrounds to an otherwise cloudless image.  We capture great cloud images whenever we find them (see Image-2 below) and might insert one once in awhile to replace a cloudless sky.  Just be sure to use one with the right directional light. 

Image 2: A Dramatic Sky Captured for Future Insertion

4.       A stable camera is a must for shooting along the ocean.  Tripods allow you to keep one eye on the ocean and still concentrate on the perfect time to trip the shutter. A cable release is very handy and avoids camera movement.  If the exposure is long (greater than a ¼ second), you may want to use your camera’s “mirror lock-up” to further reduce vibration, especially at longer focal lengths.  Remember to turn-off in-camera or in-lens vibration reduction when the camera is mounted on a tripod.  When shooting in sand, push your tripod down into the sand so it doesn't fall over.  Be sure to do this often as the ocean swirling around the legs will loosen the sand and may cause your tripod to fall over.  If windy, add a weight to the down-shaft of the tripod for additional stability.  After shooting, stand your tripod in fresh water for ½ hour to clear the salt from the legs and latches.

5.       We use graduated neutral density filters to balance the brighter sky to the foreground.  The “P” size Cokin filters (see Image-3 below) fit all of our lenses and offer a wide variety filtering effects. Use of a full neutral density filter or circular polarizer will help slow down your shutter speed if there is too much light to get the blurred water you seek. A polarizer is also useful to reduce glare if there is sun illumination shining perpendicular to the lens direction. A polarizer typically reduces exposures by 2-stops.

Image 3: Cokin Filter System with Graduated Neutral Density ND8

6       After shooting we wipe down our camera bodies and lenses to remove the unavoidable salt spray and film.  When cleaning glass be sure to gently use a wet wipe first to get the dried salt crystals off before using a microfiber cloth for the final wipe. 

7.       You are usually going to get your feet wet so it is necessary your footwear will provide adequate traction in wet and slippery rocks.  In Hawaii the water is 76-80 degrees year-round and open water shoes with climbing soles work well.  Along the California coast the water is 54-60 degrees and you might want water proof shoes to avoid the cold. 


Shoot safe,

Alan and Roger
Focus In Paradise


Sunday, August 26, 2012

Review of the Focus In Paradise Workshop in Monterey,CA Asilomar Conference Grounds - August-2012


On the weekend of August 18 & 19, we held our most recent photography workshop along the beautiful central coast of California.  The Asilomar Conference Grounds and State Beach at the tip of the Monterey Peninsula in Pacific Grove, California was our venue.


Many of the Asilomar buildings, on the edge of the Pacific Ocean, were designed by the renown architect Julia Morgan and provided an outstanding environment for practicing our classroom learning during the workshop.  Asilomar has a number of vintage Craftsman style structures combining Carmel stone, hand-hewed beams, and ornate redwood trim.


Outstanding Architecture of Merrill Hall at Asilomar 


Merrill Hall is an outstanding example of the 1920's & 1930's Arts & Crafts architecture the students were able to photograph. The challenge in this image on the left is the large variation in required depth-of-field between the base foundation and the half-round windows near the roof-line.  This signature structure on Asilomar is more than 80 years old but has been well maintained as seen in the detail of this image.


Multiple light sources illuminated the
Hearst Social Hall billiards table


After mastering all of the controls on the students' cameras during the morning classroom session, we practiced depth-of-field adjustments while photographing the many leading lines and architecture of Asilomar's trails and historic buildings.  One complex capture inside the Hearst Social Hall had multiple light sources (vintage incandescent bulbs lighting from above and exterior sunlight through the craftsman windows) creating interesting shadows on the billiards table.  We were later able to manage these competing lighting colors during our session on post-processing to produce the image on the right.  Color noise originating from the low light conditions was also also optimized to produce this warmly illuminated image.


With an afternoon study of the use of the camera's histogram features, we were ready for the sunset shoot from Asilomar Beach on Saturday evening.  It looked as though we would have great color before and after the sun went down, but the fog rolled-in just as the sun set eliminating the potential for post-sunset color.  However, the workshop students were setup well before the color disappeared and captured some very brilliant images.

Golden Sunset on Asilomar Beach

Red Sunset on Asilomar Beach

The two images above were taken within a few minutes of each other.  The moving clouds created a single light source in the Golden Sunset and a dual light source in the Red Sunset for the reflections across the ocean surface.  The differences in color can be affected by the the timing of the capture as the sun's angle is changing rapidly at sunset and also by the methods of the post-processing workflow.  In these colorful images, we used two different software packages (Lightroom-4 & Capture NX-2) during our post-processing session on Sunday which illustrates that you can greatly affect the final image during your final editing.  Both the gold and red colors were latent in each image, waiting to be brought out as desired by the editing process.

After the sun was completely down, we continued to shoot as the sky still held some illumination and we held some hope for a post-sunset color-burst that occasionally occurs, but that was not to happen this evening.  However, the rocks off the edge of the beach could still be captured with longer exposure times.  When the color of the sky becomes uninteresting but the foreground is still intriguing, we sometimes resort to "creative" post-processing techniques to rescue the image.  Using a few simple features of Photoshop, a previously captured brilliant sky, also from Asilomar Beach, was added to an image captured on Saturday evening that had a dull-gray sky, resulting in a much more colorful picture.

A new sky was added to these rocks to produce a more interesting image 
You may question if adding a better sky produces a "legitimate" picture.  We suggest that photography is not just about documenting "what was there" but also about producing the artistic image you saw in your mind's eye when you triggered your camera's shutter.  Some of the most celebrated photographers in history spent significant time in the darkroom transforming the image captured on their film negatives into a different and more stunning picture when printed.  In today's digital photography, the darkroom is the computer using the skill of the photographer operating the post-processing software to create photographic art.


Wild Flower at Point Lobos framed by the bay 

On Sunday morning we traveled a few miles down the coast to Point Lobos State Reserve south of Carmel, a beautiful state park surrounded by ocean landscapes and coastal flowers.  It was brisk weather with the sun coming out for short periods of time before hiding again in the clouds.  During this image capture, on the right, the Headland Cove ocean bay was not enjoying much sun for illumination, so it was effectively used as a "picture frame" for this Dune Buckwheat wild flower.  This image is an excellent example of using depth-of-field control to bring the viewer's eye to a single subject, the wild flower, while putting the background out-of-focus, using it as a frame.


And when the sun does pop-out at Point Lobos, the colors of the ocean are beautiful!
Headland Cove - Point Lobos State Reserve


After a warm-up lunch in Asilomar's Hearst Social Hall, we completed the workshop with post-processing and printing of the students' images using Lightroom-4, Photoshop Elements, and Capture NX-2.  Post-processing is a subject that can consume entire multi-day workshops.  We intend to offer a full day class on editing and printing in our future workshops.

As instructors we were impressed with how quickly the students grasped the concepts of the color-of-light, image sensor ISO sensitivity, shutter speed, aperture, and exposure compensation, and how they all interact.  By the workshop closing, everyone of them was proficient in using their digital SLR cameras in a way that would enable their future photographic creativity.

Thanks to all of the students for helping make this a successful photography workshop!
We also thank Asilomar Conference Grounds for providing their outstanding facilities and environment.


Our next photography workshop takes us to Kauai in early November and then a return to the Monterey Peninsula in late February.  Look for details about our workshop schedules on this web site.
And as always if you have a photography question contact us at: FocusInParadise@gmail.com   we are always glad to help.

Happy shooting,

Focus In Paradise


Sunday, July 15, 2012

Hyperfocal Distance for Landscape Photography


A Tutorial & Simple Calculations


What is Hyperfocal Distance?

In landscape photography, the question we repeatedly ask ourselves as we are composing an image is:
w h a t      w i l l      b e      i n      f o c u s ?

We frequently attempt to control the depth-of-field of focus of our image such that the image is in sharp focus at a far distance (e.g. infinity) and also sharp up to a desired point much closer to the position of the camera.
Note: this is just the opposite of what we want when creating portraits that typically benefit from a shallow range of sharp focus.

When your camera’s focus point is at what is known as the Hyperfocal Distance (HD) it is set for the greatest possible depth-of-field for a given set of lens settings and the camera system. Everything from about ½ of the HD to very, very far away will be in good focus. Consider a hypothetical example in the cartoon below that depicts this. Let's say you are hiking in the mountains of Tibet and come upon a few photogenic high mountain oxen in front of a lake and you want the oxen, lake and mountains to be in focus. If you focus at the HD point, the range of acceptably sharp focus will be from the first ox to the distant mountains.


Of course the challenge is to set the HD so everything you want sharp is in focus, determine where the HD point is located and then to put your camera’s focus point there. This sounds complicated but learning to do this quickly is the topic of this tutorial and will add strength to your images!


Why should you care?

Think of the mountain landscape described above with oxen in the foreground, a lake behind them and mountains in the distant background – and you want to have all of it in focus. If you put your camera focus point on the first ox, that ox will certainly be in sharp focus. However, it is likely the distant background will be out-of-focus as seen here in Image-1. This limited range of focus is sometimes desired, but for landscapes we generally want the background in sharp focus too.


Image-1: Focus Point is Closer than the HD Point


Now think of the same mountain landscape scene but with the camera's focal point far back in the water behind the oxen. This moves the range of focus further back, fixing the sharpness of the mountains, but taking the first ox out of sharp focus as seen below in Image-2. Again this is sometimes desired, but generally a good landscape image tries to keep all important objects in focus.


Image-2: Focus Point is Further than the HD Point


Using knowledge of the HD, we can have substantial control over what range of depth will be acceptably sharp to our eye in the final image. Focusing the camera at the HD point just behind the oxen at the edge of the water and adjusting the lens aperture so that the oxen are at least ½ of HD away from the camera, we can maximize the range of sharp focus. The result is the entire image being in focus, typical of a landscape image, as seen in Image-3 below.


Image-3: Focus Point is at the HD Point- everything is in sharp focus


Establishing the range of sharp focus is one of the most important elements you can control leading to a great landscape image. Next we will discuss how to adjust your camera to attain this result.


How does HD work?

As we know, the depth-of-field of an image is determined by the aperture of the lens and its focal length. It is also dependent upon the size of the image sensor in your camera. A larger lens f-number (smaller aperture) produces a greater depth-of-field. The depth-of-field is also a very strong function of the lens’ focal length - the smaller the focal length, the greater the depth-of-field and vise-versa. Finally, a smaller image sensor will produce a greater depth-of-field – which is why tiny cell phone cameras typically produce pictures with everything in focus, although they have other significant limitations.

You have reasonable adjustment of three of the four aspects of this camera system that determine the resulting depth-of-field in your image: the aperture, the lens focal length, and the distance from the camera to the focus point. You don’t have control over the fourth element, the image sensor size, unless you are willing to buy a new camera body!

The property of the image sensor that affects depth-of-field is called the “circle-of-confusion” (CoC). The CoC is the size of the largest blur-spot that the human eye will still consider to be a “sharp point” (rather than a blur) when viewing an 8x10 inch print at a typical viewing distance of 25 cm (or about 10 inches). As the CoC becomes larger, the smaller the depth-of-field that is possible from the image sensor.
Table-1 below describes the relationship between sensor type and CoC. Most consumer Digital SLR cameras on the market today use an APS-C sized image sensor, while most small digital cameras that will fit in your pocket use an image sensor closer to 6mm x 4mm in size. Not shown in the table are cell phone sensors that are approximately 4mm x 3mm in size.

Camera Sensor TypeSensor Size (mm)CoC (mm)
Full Frame36.0 x 24.00.029
APS-C23.6 x 15.70.019
Four Thirds18 x 13.50.015
Point & Shoot6.2 x 4.10.005

Table-1: Sensor Specifications


The knowledge to take away here is that the larger the sensor (and correspondingly the more money you paid for the camera body), the larger the CoC and the smaller you can make the depth-of-field. This greater adjustment control over depth-of-field with a larger sensor allows you to place the range of focus more precisely and thus control where the viewers' eyes will be drawn.


Caution – here comes the Math!

In the “olden days” of film, lenses were mostly primes (i.e. a single focal length, not a zoom) and there was a scale on the focus ring that indicated the near and far ends of the range-of-sharp-focus. Now with zoom lenses with a fixed barrel (where there is only internal movement of lens elements for focus), we don’t have the depth-of-field scales anymore on the focus ring. To know the range of focus, you must compute the HD for your particular camera + lens settings. You can do this with a little math or refer to a chart (we’ll help with that a little later too). The HD calculation only requires three numbers: the focal length (FL) of the lens, the lens aperture f-number (Fn), and the circle-of-confusion (CoC) for the camera sensor (from the table above). And with these numbers, here is the equation to compute HD:

HD = (FL x FL) / (Fn x CoC) + FL
(Equation-1: Hyperfocal Distance)


Now if you focus your camera at a distance equal to HD, then the range of acceptably sharp focus is from approximately ½ x HD to Infinity. Let’s do an example using an APS-C camera, a zoom lens adjusted to a focal length of 100 mm, and the lens aperture set to f/8. With these numbers, then:

 HD = (100 x 100) / (8 x 0.019) + 100 and doing the algebra HD = 65,889 mm or HD = 216 feet

So if you now focus your camera at a point that is about 216 feet away, everything from about 108 feet away (which is ½ of HD) to Infinity will be in focus.
But what do you do if you want the object that is only about 50 feet away to be in focus? Well, looking at Equation-1, you have three options to get that object into focus:

   #1) Focus the camera at a point that is closer to the desired object as in Image-1. However, this will cause the
         image at a very, very far distance away to be a little out-of-focus

   #2) Change the lens f-number (or f-stop) to a larger value (which is a smaller aperture). If you doubled
         the f-number to f/16, then everything from about 54 feet to Infinity will be in acceptably sharp focus.

   #3) Change the focal length of the lens to a wider-angle view (or lower zoom). If you reduce the focal length to
         70 mm, this would result in everything from about 53 feet to Infinity being in acceptably sharp focus.


Simplifying the Math with a Chart

Wow – that’s a lot of math to be doing when you just want to make sure that your foreground and background are both in focus! Well we have a quick-reference chart in Chart-1 below for you to use that will allow you to estimate HD in a couple of seconds. It covers focal lengths of 10 mm to 600 mm with apertures of f/2.8 to f/32


Chart-1: Hyperfocal Distance vs. Focal Length for Aperture Series


Looking at the Log-Log chart above, you can see that intuitively it describes what you would expect to see: the bottom line that represents an aperture of f/32, has the greatest depth-of-field (or shortest HD) and similarly the top line of aperture f/2.8 has the smallest depth-of-field (or largest HD).

In Chart-2 below, we highlight the two options of #2 and #3 above to reduce the HD by a factor of two and thus extending the depth-of-focus. The red-arrow lines shows the original 100 mm focal length and f/8 aperture and how they lead to an HD of about 200 ft. The green-arrow lines shows the result of changing the f/stop to f/16, resulting in an HD of about 100 ft. Finally, the blue-arrow lines show the result of reducing the focal length to 70 mm and keeping the aperture at f/8, also producing an HD of about 100 ft. In both of these solutions (green & blue arrows), we have extended the focus range from about 100 ft to Infinity to about 50 ft to Infinity, producing a great landscape image!


Chart-2: Two Solutions to Extending the Depth-of-Focus


These HD charts were created in an Excel worksheet model that allows you to change the focal lengths, sensor type, and apertures for analysis. If you would like a copy of this worksheet, just request one at our email address:
 FocusInParadise@gmail.com


Conclusions

We hope this tutorial has provided some insight into how Hyperfocal Distance has a significant impact on your landscape images. With this knowledge you should be able to more precisely adjust your camera to define the desired range of focus that will be sharp to the viewers' eyes. Use this technique to keep objects important to the image in sharp focus and to put the other objects out of focus.

In a future blog post, we will discuss how to compute any depth-of-field, not just one that reaches to Infinity. This will be very useful for portraits and macro images.

Happy shooting,

Focus In Paradise